How to Expose the S4HANA ABAP CDS View to Fiori App
Using the following points to expose the S4HANA CDS view to Fiori App
1. Creation of CDS View .
2. Creation of Odata service for the CDS view .
3. Using Odata Service in Fiori Application .
Following Step by Step Process for the above points.
Point 1. Creation of CDS View.
Object.

Step-1.2 : Select the Data Definition in Core Data services.

Step-1.3 : Fill the details Project , Package ,Name & Description and Click on Next.

Step-1.4 : Click on Next.

Step-1.5 : Select the type of template is required and click on Finish.

Step-1.6 : See the Below mention Details & Script Screenshot which is expose the MARA Table With limited Columns . After Giving the Script Save the file.
- ZCDS_SQL is the ABAP View name when activated view is created in ABAP
- MARA is the table name (We can use the table or view Name)
- ZCDS_DDL is the Entity name (File name is also same)
- @Odata.publish:ture is used to expose the data trough odata default Odata name is ZCDS_DDL_CDS('Entity'+_CDS)

Step-1.7 : For activation the DDL file . Right click on DDL file and select Active option .

Step-1.8 : After click on active we can see the Activation pop-up.

Step-1.9 : File is successfully activated.

Step-1.10 : For Checking the ABAP view . Go to the GUI and Open the T-Code SE11 . Select the view and give the view name and click on Display.

Step-1.11 : For Checking the data click on Contents .

Step-1.12 : Select Execute.

Step-1.13 : Below Screenshot we can see the data which are given in the CDS view.

Point 2. Creation of Odata service for the CDS view.

Step-2.2 : Provide the System Alias & Technical Service Name and Click on Get Services . Click on Add Selected Services .

Step-2.3 : Then Service is added into the services list.

Step-2.4 : For Checking the Odata Select the service and click on Call Browser.

Step-2.5 : Below Response will come .

Point 3. Using Odata Service in Fiori Application .

Step-3.2 : Place the destination Configuration file in following folder
WEB ide→config_master→service.destinations→destinations .

Step-3.3 : Login to the WED IDE (http://localhost:8080/webide/index.html) .

Step-3.4 : Login the user (If not having the user click on Create a new Account).

Step-3.5 : Right click on Local and select the Project from template .

Step-3.6 : Select the Template and Click on Next.

Step-3.7 : Provide the Project Name and Click on Next.

Step-3.8 : Select the Service (Configuration File) and Select the Odata service . Click on Next.

Step-3.9 : Provide the Following Details and we can change the details is shown in the Before Steps . Click on Next .

Step-3.10 : Click on Finish.

Step-3.11 : Right Click on package and select the SAP Fiori Component .

Step-3.11 : Right Click on package and select the SAP Fiori Component .
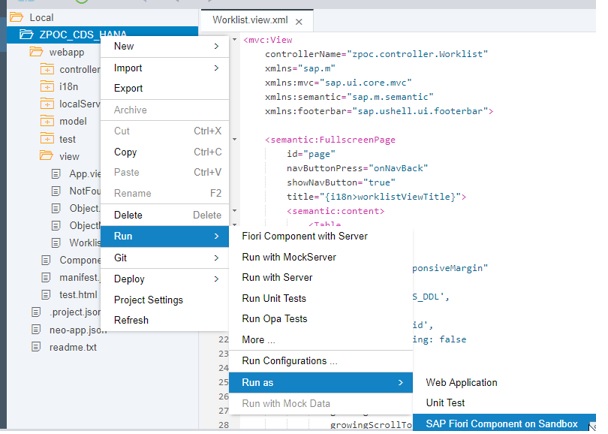
Step-3.12 : We are getting the only we columns . Need to add the other columns.

Step-3.13 : For adding the Columns we change the following Script in Worklist.view.xml . And save the Script .


Step-3.14 : Re-run the Package same as 'Step-3.11' we can the data.


Comments
Post a Comment